Discover the best yoga poses for arm strength to boost your biceps and toughen your triceps while also reducing your injury risk, improving posture and stabilising your joints…
Did you know, yoga is a highly effective tool for building arm strength?
When we think of the benefits of arm strength, we tend to associate it with lifting heavier weights (which, of course, you will be able to do), but the fitness perks of a strong upper body go much further. While you’d expect stronger arms and shoulders to improve your pull-ups, swimming, rowing and boxing performance, they also support your running technique, increasing both speed and endurance.
Check out the best hip-opening yoga poses and exercises
Then there’s the functional benefits to consider too, from carrying shopping to picking up the kids. Plus, working your arm muscles also strengthens your bones – the added stress helping build bone density. Of course, upper body strength will enhance your yoga practice as well – arm and shoulder strength helps prevent tiredness in inverted poses such as downward dog, while experienced yogis need strong arm muscles, along with core strength, for more advanced balances such as flying pigeon and handstand.
The muscular anatomy of your arms
The muscles in the front of your upper arm (biceps, brachialis and coracobrachialis) are the ones most associated with strength, used for pushing, pulling and lifting. Anatomically, they’re the ones that allow you to bend your elbow, bring your upper arm into your body and stabilise your shoulder joint. On the back of your upper arm, your triceps and anconeus muscles also help stabilise the shoulder and allow you to straighten your arm.
Your forearm muscles are more complex, consisting of superficial, intermediate and deep layers. Those on your inner arm control the rotation of your arm and flexion of the wrist and fingers, while the muscles on the back of your forearm extend the thumb and fingers. Keep reading to discover the best yoga poses for improving arm strength and shoulder stability.
Try this 10-minute Pilates arm workout for women
Biceps and triceps
Get the low down on those all-important upper arm muscles…
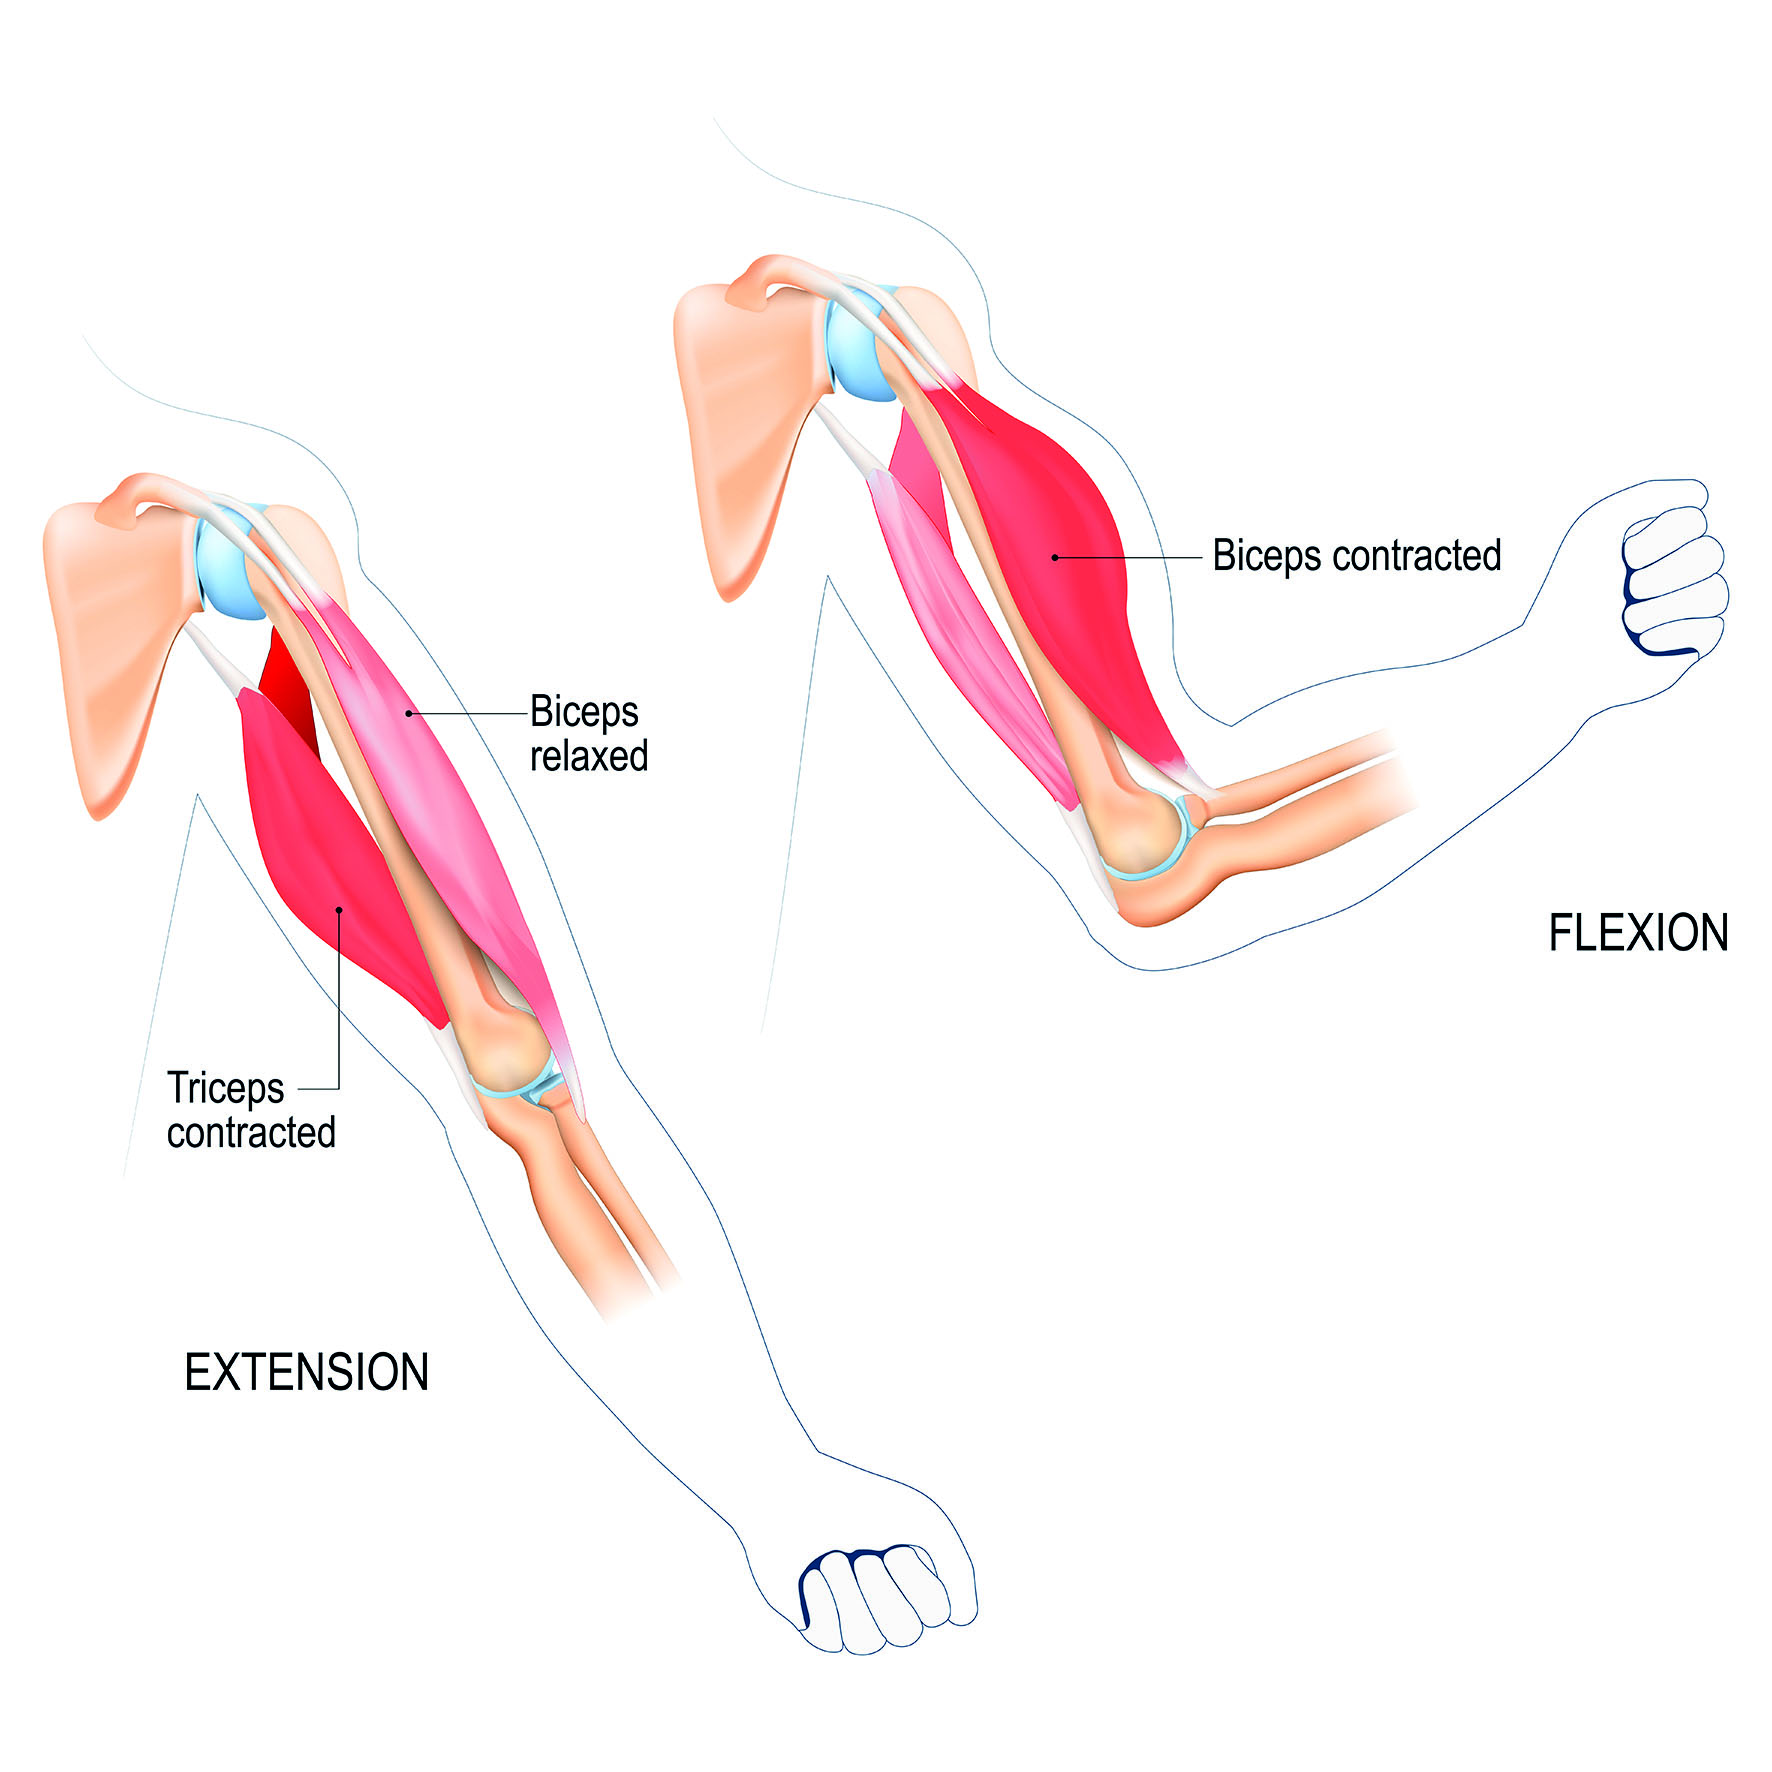
- Anatomy: Your biceps has two heads (hence ‘bi’) at the top, connecting to the front and back of your shoulder and, at the base, connecting to your forearm. Your triceps, on the back of your arm, has three heads (hence ‘tri’) at the top – one on the scapula and two on your upper arm. It connects to the top of your lower arm on the ulna bone.
- Action: The biceps are responsible for flexing your elbow, supinating your forearm (turning it palm up) and slightly flexing your arm at the shoulder. Your triceps straightens your elbow and stabilises the shoulder joint.
- Everyday use: Biceps – picking up an object. Triceps – throwing an object, pushing a door closed.
- Sports use: Biceps – rowing, climbing, boxing. Triceps – netball, volleyball.
- Common problems: When tight, your biceps and triceps can prevent you straightening your elbow, but it’s quite rare with your triceps muscles.
- Stretching poses: Biceps –hands clasped behind back and raise with straight arms. Triceps – cow face arms.
- Strengthening poses: Biceps – four-legged staff. Triceps – plank, crow.
Yoga sequence for arm strength
How to use these yoga poses:
- Aim to practise these poses two to three times a week to build arm and shoulder strength.
- Warm your body with two rounds of half sun salutes then three rounds of sun salute B (see box, right).
- Next, take your attention to your arms. Either standing or in easy pose, do three rounds on each side of cow face arms and eagle arms, stretching a little further each time.
- Finally, interlace your fingers behind your back and fold forwards, raising your straightened arms as you do so. Hold for five breaths then lower and repeat twice more.
- Then, follow the sequence in the order given, holding each pose for the time stated, and breathing deeply into your abdomen. If your arms tire or you need a rest, take a moment in child’s pose between moves, repeating the sequence twice through.
1. One-legged plank
Benefits: opens and strengthens the shoulders
Targets: works the biceps, triceps and muscles of the forearm
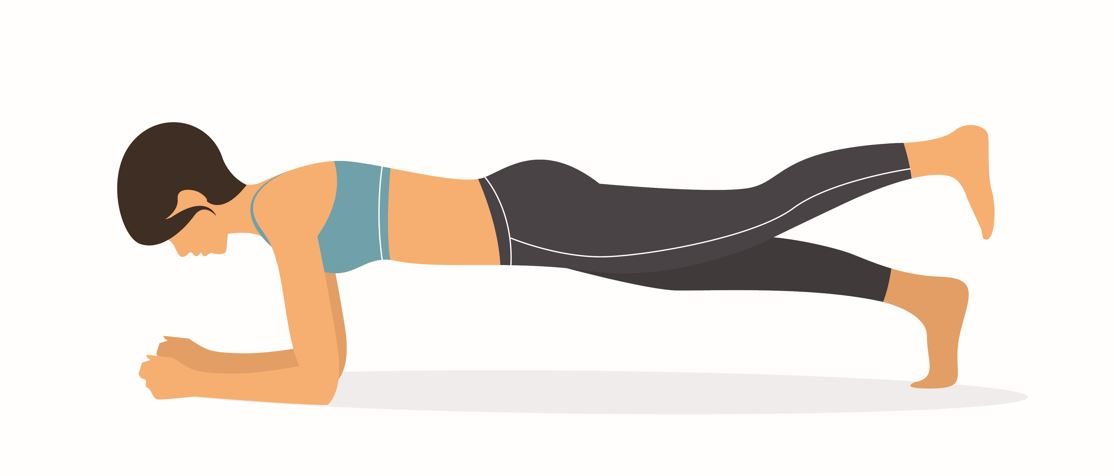
How to do one-legged plank:
- Start on all-fours, hands directly below your shoulders, knees beneath your hips.
- Tuck under your toes and walk your hands forward until your body is in a straight line from your ankles to your head. Tuck in your chin to maintain length in the back of your neck. Lower onto your forearms, elbows shoulder-width apart, engage your leg muscles to lift your thighs, then raise one leg and hold for up to 30 seconds.
- Breathe evenly as you draw your belly button to your spine to support your lower back.
Make it easier: Rest on both feet, lower onto your knees.
Make it harder: Come up onto your hands and add a weighted row with dumbbells.
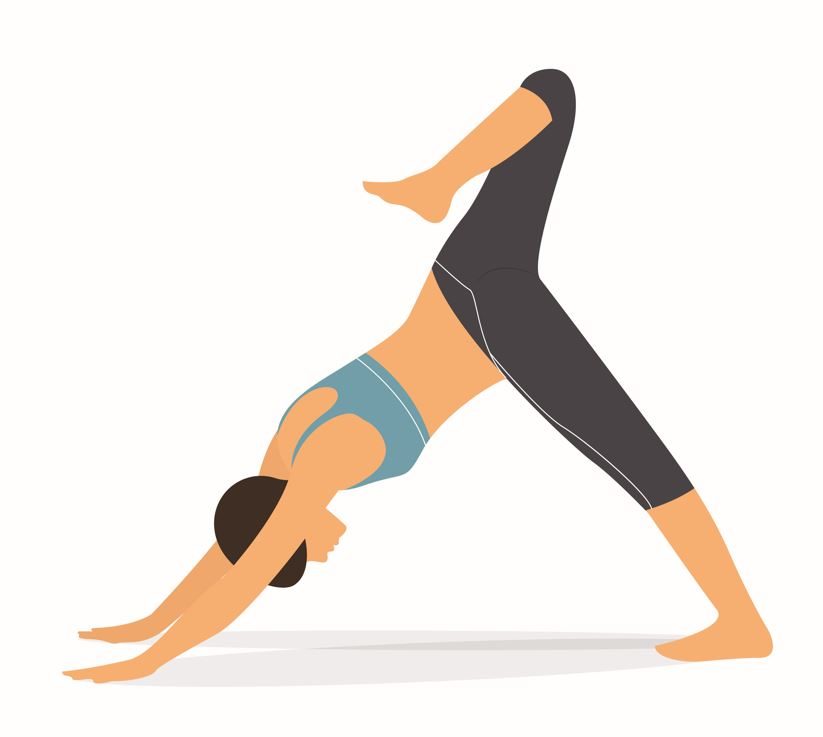
2. One-leg down dog
Benefits: tones arms, strengthens wrists, stretches and strengthens shoulders
Targets: triceps engages to straighten arms, biceps lengthen, deltoids stabilise shoulders
How to do one-leg down dog:
- From all-fours, place your hands a palm’s length in front of your shoulders, shoulder-width apart and fingers spread. Tuck under your toes and raise your knees off the mat, taking your tailbone back and up. Root through your hands to lengthen your spine.
- Rotate your upper arms outwards and draw your shoulder blades down your spine. Root your left foot into the floor and extend your right foot upwards, opening your right hip and bending the knee deeply.
- Breathe into your abdomen for up to 30 seconds. Exhale to return your foot to the ground and repeat on the other side.
Make it easier: Keep a slight bend in supporting leg, keep raised leg straight.
Make it harder: Increase length of time in the pose.
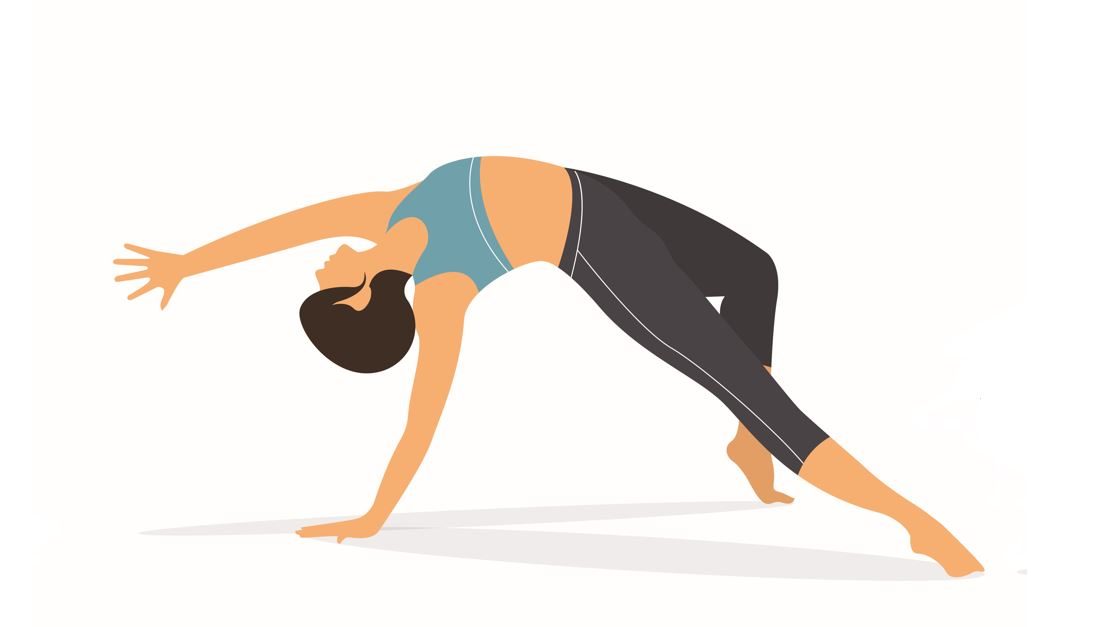
3. Wild thing
Benefits: opens and strengthens the shoulders
Targets: triceps engage to straighten arms, biceps lengthen, deltoids stabilise shoulders
How to do the wild thing yoga pose:
- From down dog, transfer your upper body weight onto your right hand and roll onto the outer edge of your right foot, resting your left hand on your hips.
- On an inhalation, raise your hips strongly as you ground through your right hand and pivot your body to face the side.
- As you exhale, bend your left leg and place your toes on the ground behind you. Lift through the chest to arch your back, and, if comfortable, sweep your left arm up alongside your ear.
- Hold for five-to-10 breaths, then return to downward dog, and repeat on the other side.
Make it easier: Practise getting into the pose from side plank. Alternatively, from one-legged down dog (see 2), gradually open your top hip and, each time you practise, take your heel a little lower until it reaches the ground.
Make it harder: Reach your raised hand back to grasp your left calf or ankle.
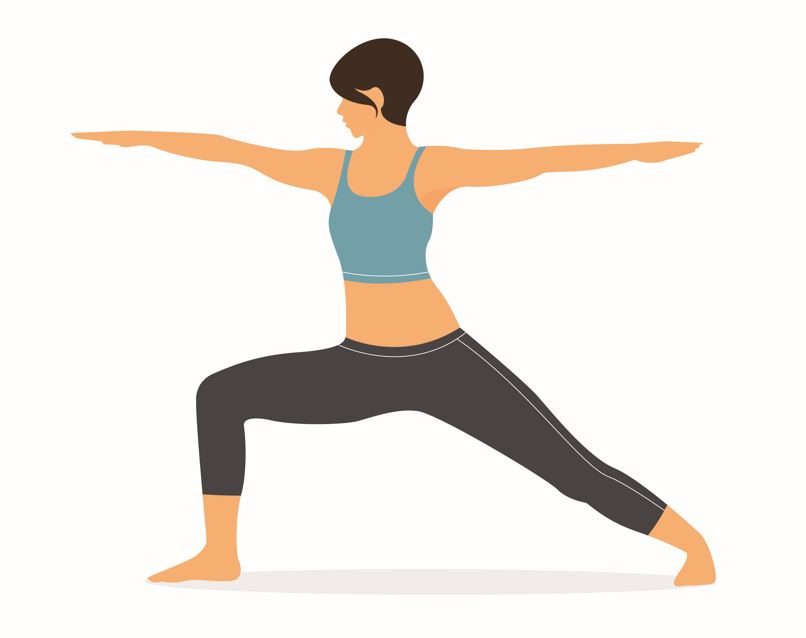
4. Warrior II
Benefits: Strengthens arms and shoulders, including rotator cuff
Targets: Deltoids stabilise shoulders and raise the arms, triceps extend elbows, pronator quadratus turns palms down
How to do warrior II:
- Facing sideways, turn your front foot out 90 degrees, back foot in 15 degrees. Root through big and little toes, raise your inner arches and ground through outside edge of your back foot.
- With weight balanced evenly between both feet and your pelvis in neutral, bend your right leg to take your knee over your ankle.
- Inhale to raise your arms to the sides, palms facing the floor. Lengthen from your centre to beyond your fingertips and turn to look over your front arm. Remain here for up to 60 seconds, then release, shake your arms out and switch sides.
Make it easier: Press back foot against a wall or rest front thigh on a stool.
Make it harder: Increase the time spent in the pose with arms raised or add dumbbells.
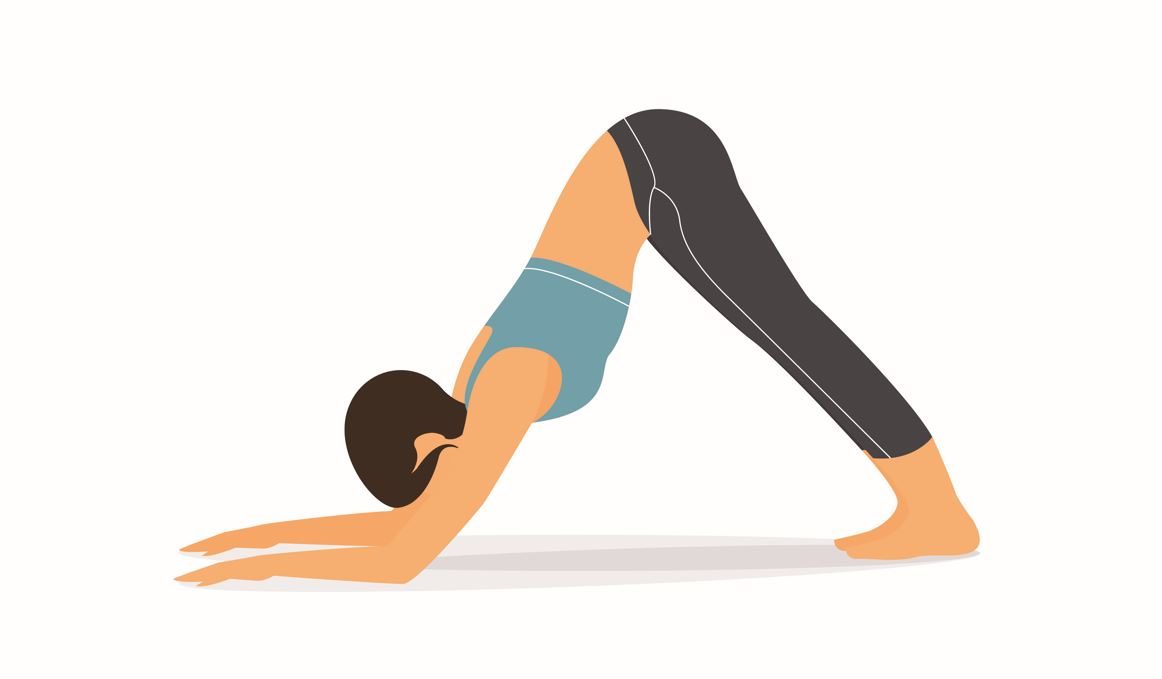
5. Dolphin
Benefits: greater range of motion in shoulders, increased arm and shoulder strength in preparation for inversions
Targets: works the biceps, triceps and muscles of the forearm
How to do dolphin:
- Kneel in the centre of your mat, reach forwards and place your forearms on the floor, shoulder-width apart, forearms parallel and fingers spread wide.
- Rooting down with your hands and forearms to raise your shoulders from the ground. Look towards your feet, tuck your toes under and raise your hips to come into an inverted ‘V’ shape with straight legs, heels reaching to the floor.
- Hold for 10-15 breaths then lower into child’s pose. If you find your elbows moving apart, tie a strap around your arms, just above your elbows, and place a block between your hands.
Make it easier: Clasp your hands together, fingers interlaced to create a ‘V’ shape with your forearms. Gradually work towards straight legs and lowered heels.
Make it harder: Raise legs into forearm balance (pincha mayurasana).
Discover the best yoga poses for building leg strength
Words: Eve Boggenpoel | Illustrations: Shutterstock

